The world's first near fatal production! 1 minute of animated cartoon goodness produced in less than 8 short days!
(WATCH our exciting cartoon and READ about how we fought both disease and boring family Christmas events to get this cartoon done)
watch Timmy's Christmas here:

Check it out on the official www.FILMAKA.com contest website.
tell us what you think! Drop a comment.
Curious how we pulled it off? Watch the toon first so you don't spoil it, and then keep readin!
(warning: spoiler images below)
(edit: i noticed this is a super long post to here's some quick links for those who are interested)
concept
storyboarding
animatic+sound
music (royalty free)
layouts
our quick animation prep and format
animation + cleanup + color
sample animation roughs
Tools
BG painting and exporting
Compositing
Editing + Final Sound
short list of artists
CONCEPT
Our deadline for the Filmaka Contest gave us only 8 days. I didn't have much time to pack, so I filled my canteen, grabbed my compass, machette, and my favorite sheepskin tunic and ran off. It's hard to rush creativity, so I started looking back through my old ideas for one to polish. Chris reminded me of this old comic that I had drawn up a while back:
BASIS FOR TOON (my old comic)
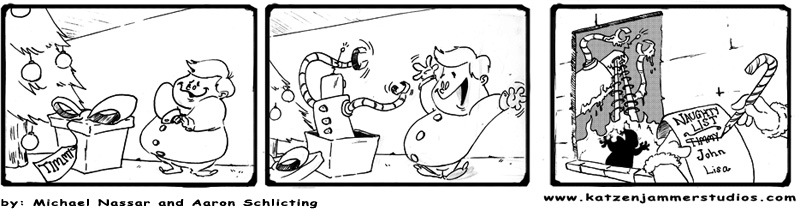
-original post-
I used this old comic as a springboard and began storyboarding immediately. All the story points are present in a decent 3 panel comic. Including the most important element, a punchline; which is used as the spine of the whole story and dictated most of the decision making.
STORYBOARDING IN FLASH
The storyboards were done directly in Flash, this is because Flash saves tremendous time by allowing:
1) seamless progression to the animatic stage (animatic was also done in Flash)
2) easy uploading and feedback from my online team
3) time saving drawing & cut/paste tools
STORYBOARDS ver. 4
click the arrows to navigate the panels. (p.s. please forgive my spelling of naughty)
ANIMATIC & SOUND
MOST of the production time was spent in the animatic stage.
This is important to spend your time on because no matter of animation, color, and frills can save a poorly planned idea or joke. Ultimately, you can't polish a turd (unless you have an extremely solid diet).
Animatic (ver.3) - Timmy's Christmas
DO SOME SOUND DESIGN EARLY AT THE ANIMATIC STAGE. Well planned sound design can make sure your gags are funny and also help speed up the final post-production work.
Sound is extremely important to a gag because it can be used as an emotional set-up or a punctuation to a gag.
In Timmy's Christmas we used sound in the end scene to establish a calm mood just before violence enters the shot and loud noises disrupt the calm.
Doing some sound at the animatic stage helps to speed up post-production sound and editing.
While dropping sounds into the animatic I kept careful track of what files I used by dropping them into a special project folder specifically for scene sounds. So during final editing I used this folder so I could simply re-drop in the sounds I needed for the scene with little/no searching needed.
Another way to do this, is to NOT do your animatic in Flash, but do the animatic in your final editing program. Work within the same project, but perhaps on a new timeline when you do your final edit.
By working within the same project your editing program inherently keeps track of all the files you've been using.
MUSIC
I couldn't afford the time or money to pay a composer or even a local music loving hippie (Chris was busy at the time and Jerry Garcia is dead) to make music for me, so I used Royalty-free music.
Royalty-free music seemed like a good alternative because of the SOMETIMES good quality, immediate availability on the web, and generally low cost and liberal-use rights allowed.
Royalty free music is music that you buy once but generally don't have to pay any additional high cost license or per-use fees. I couldn't use any random CD in my collection, because CD ownership entitles the purchaser some listening use, but no distribution use.
Any music types out there know about rights and music and all the jazz, please drop us a line or leave us a comment.
Doing a web search for "royalty free music" should dig up some fine results, but here's some of the sources I used for music:
Royalty free Classical Music
http://www.uniquetracks.com/
http://www.premiumbeat.com/
http://musicbakery.com/
http://www.partnersinrhyme.com/
BE CERTAIN TO READ ABOUT THE THE MUSIC PROVIDER'S LICENSING AND FEES!
Some sources put a limit on song use over a certain amount, like 10 thousand units. This may make some sense in physical media, like printing and selling DVDs, but gets buggy in online distribution when thousands of youtube/web hits are much more easily possible. Try to find the best quality music you can with the most/unlimited use and distribution rights allowed.
FINDING MUSIC
Sound in the animatic stage allows for a lot of exploration and great opportunities to better the cartoon. The music I ultimately used worked better than the music I originally intended on using. Something I did was simply playing music in the background of my PC while I sat and watched the animatic a hundred times until something really hit home.
Sites like Partners in Rhyme use web page embedded flash players which allow you to play songs in the background while you WATCH THE ANIMATIC AND LISTEN.
Use your own music too. But use music you own to help establish a touchstone to what you are ultimately trying to get and find similar royalty-free music online.
LAYOUTS


These layouts were done by John Martinez. We prepared these for distribution to the animators, but worried about coloring them at the end.
The outlines squares around the BG roughly indicate the composition of the "camera" during pans.
ANIMATION PREP:
While we only had four animators, it was still important that everyone work in a similar fashion so that the film came out seamless like a brightly-colored, plastic dress those German gogo girls wear to the local discoteca.
I made a template for most of the animator's scenes with a reference layers and the resolution and "frames-per-second" pre-established.
Also, I timed out each scene of the animatic and provided the frame count of their scenes. This way animation wouldn't deviate too much from the animatic and the timing/pacing would end up similar to what I planned.
I also told animators to work with the smallest sized paintbrush tool in flash so all the linework would be somewhat congruent. However, David's line strokes seem to be fairly thinner than the rest of the animators. I think this may be an issue with either the type of Wacom he was using, or the amount of ZOOM he applied to his workspace while animating. This wasn't a big deal because we all worked pretty thin and Dave's animation came out fantastic and kicked some major ass.
FORMAT
The flash files are formated to 24 fps (frames per second) and 720 x 540 pixels, this is the 4:3 ratio for your standard boob-tube (TV); although there are additional issues with square and rectangle pixels and other mind blowing NTSC TV format issues which I don't think i really understand.
Ultimately, we shrink the file for online distribution, but we wanted a master created at the proper size just in case we put our stuff on a DVD or something. In the future we'll likely work at HD resolution, but still distributed smaller format toons for the online type computer screen.
ANIMATION & CLEAN-UP
Rough animation is generally placed on one of the bottom layer in a loose red or blue line. It doesn't have to be any of those colors, perhaps we're just creatures of habit, so long as the rough line isn't too dark and won't interfere with the dark near black clean-up in the next stage.
CLEAN UP TAKES A LONG TIME, SO PLAN FOR IT!
Clean-up was done on a new top layer using the smallest brush tool in flash with NO pressure sensitivity turned on (the pressure button option appears in the Flash tool panel when you have a Wacom tablet installed on your machine with the drivers installed).
Animating in Flash is SUPER EFFICIENT, but cleaning up in flash is the biggest blackhole of time ever!
I wish we had ink and paint interns! Old ladies who could put down some sweet linework into your rough drawing and pay 2 pents for their time!
Roughly 25% of our time was spent animating keys and in-betweens. Then 75% of our time cleaning up a SEMI-tied down line.
CLEAN-UP is like a little kid. It requires a lot of attention and time, but ultimately doesn't do much.
Clean-up is like a good girl/boyfriend. Time consuming and boring.
CLEAN-UP JUST SUCKS!
COLOR
All the animators had to turn in their animation cleaned up and pre-painted in a neutral gray color. This way we could easily 1-click paint fills with the character colors without worrying about too many holes in the line-work.
Two methods to closing gaps for coloring:
1) use the pencil tool to outline the section you want to color
or
2) use the "close gaps" function listed within the paint bucket tool

The default value for function is CLOSE SMALL GAPS. To speed up "gray filling" I set it to close MEDIUM or LARGE gaps, but at the cost of sometimes creating small white/clear spaces in the corners of the linework. So I used the medium setting sparingly and tried to stick with close small gaps.
I generally use both methods #1 and #2 to fill grays and color, but method #2 is certainly the fastest; provided you understand the whitespace consequence.
SAMPLE ROUGHS AND CLEAN-UPS


DAVID GEMMIL'S FUNNY ASS EXPRESSIONS (scene 1)


EVERY SINGLE FRAME DAVID CREATED IS HILARIOUS!

TOOLS
Animation was done directly in Flash using Wacom tablets.
Except for Chris, who uses a Fisher Price bubble-bath toy to animate.
As you probably figured out, we used the Flash software to do the animation but primarily used it as an ink and paint tool with some very occasional "camera" and animation hacks and shortcuts.
We wanted to use flash to change the way we DO animation, but we didn't want to use Flash to change the animation itself!
We still wanted to draw a lot of crap and use as few hacks as possible! Balancing cool and unique drawings and movements with sensible time saving methods was all personal preference of the animator, but we all generally erred on the side of many many unique drawings; an inefficient but dominant addiction of ours.
Chris has a good sense of when to draw and when to tween, when he does it right you don't even notice the tween and everything feels like drawn animation in his style.
Ultimately, provided we could survive the real work time constraints, we used as little shortcuts as possible and drew new drawings as often as time could afford us.
We still used some tweens and limited animation, some where just smart efficient work flow choices and some tweens were just a byproduct of the lack of time we had.
I've become pretty efficient using tablets to draw, but I wonder how much more efficient clean-up or drawing times would be with a Cintiq; would it be substantial or marginal?
Considering that I've grown very comfortable with a tablet I'm not sure if Cintiqs would be a huge time saver. Can anyone shed some light on this based on their own experiences using both tablet and Cintiq?
Is the cost of a Cintiq worth one's first born?
BACKGROUND PAINTING


We scanned in the linework into Photoshop; usually at 300dpi. We adjusted the contract and set the linework to multiply and painted on a separate layer below the linework.
We did IMAGE>ADJUSTMENTS>AUTO-LEVELS to make sure the linework was dark the the paper was white as possible. This is because white pixels disappear when a layer is set to "multiply" but gray layers will influence the colors underneath.
After coloring was done, we exported the file for compositing.
NOTES ON EXPORTING BGs
I had to plan close-up shots by working in a high rez DPI.
After scanning and importing into photoshop, the BG is usually painted at 300 dpi (occasionally 150 dpi if my PC doesn't have URUMPH! to effectively paint large files).
This amount of DPI usually produces an image much much larger than you need for the final cartoon's output.
I only really needed about a 72 DPI image for the final output.
But working at high resolution allowed us to do close ups on an BG without pixelation and without creating a new BG for every close up.
This BG re-use saves us tons of time because BGs, like the first one, could be designed to try to work within multiple shots.
I'd either export the BG at full rez, or roughly calculate the required resolution for compositing.
If I was doin a close up by double. I would calculate at least 72 x 2 = 144 DPI was needed.
or if I was doing a roughly 50% additional zoom I had to have at least 72 x 1.5 = 108 DPI.
I'm not certain that this is the most effective way to work with BGs, but I did want to make certain I wasn't getting pixelation on a 72 DPI image.
If anyone out there has any good compositing or BG tips please drop us a comment and let us know!
SOME EFFECTS & FINISHING TOUCHES (by Chris)


This is what every Christmas gift must look like to a kid. Only to later find himself/herself disappointed that the gift housed boring old clothes!


(this robot was inspired by true life Christmas events of my childhood).
COMPOSITING
After Effects was used to help make the flash line-work look less FLASHy and try to achieve a more traditional cel animation aesthetic.
Here's a few ways to approach non-Flashy Flash animation:
1. Animate each frame using no tweens or very few tweens as possible.
2. Use a compositing tool, like after effects, to change the way the image is rendered and add less flatness and more visual variation to the line and the colors using filters and other effects.
3. Animate on paper, then scan the drawings and convert to vector and use flash mostly to color the animation.
(There was noooooo way we could afford the time to do this on this project. Although we've done it on other projects, it was out of the question for this cartoon due to time limits)
4. Simply not care about useless details that waste your time.
5. Lower your standards.
COMPOSITING IN AFTER EFFECTS
Flash exports
I exported the Flash animation into folders as a .PNG sequence. PNG files allow for transparencies and produce a high quality image. JPGs are generally too compressed, and .TIFF files are great but HUGE.
Quicktimes, can just be a headache.
I did not export the animation as quicktimes because the frame rate of the quicktimes was inconsistent and jumpy when exporting out of Flash.
I'm no video expert so I don't quite know the exact reasons for this. But I heard that young Flash film makers have bare fist punched their monitors and friends around them in frustration from dealing with quicktimes in Flash.
Be cool, export PNG sequences and don't punch your pals and don't export screwy quicktimes from large Flash files.
After Effects & FILTER EFFECTS (CEL ANIMATION LOOK):
We used after effects to slightly blow-out and blur the line work and apply a couple grain filters and lens effects. We used these collection of filters and techniques try to make the animation look like more traditionally shot animation on cels and feel less crisp and digital.
We take the character layer and duplicate it and apply a Gaussian blur and low opacity to that duplicated layer; it kept the linework from looking too crisp and flashy. We also added a few more filters, like grain filters, to give the artwork some more variation within the flat colors.
We've been lightly messing with this compositing business for a little while. Also, Nick Cross has been doing stuff like this for a long time!
Check out Nick Cross' blog for some really really good examples of visual compositing hacks for animation.
A NOTE ON CAMERA PANS:
I found out the hard way that camera pans take forever to render in After Effects!
Doing Camera pans in Flash saves tons of time because render times are pretty much non-exsistent compared to After Effects.
If cutting render time is a concern, then try to do your pans in Flash by nesting your animation into a master symbol and animating the master symbol in the workspace as if it were a camera move.
If control and quality is a bigger concern, then stick with keeping your work flow segmented and doing pans and effects only in after effects.
EDITING AND FINAL SOUND
was fun.
Software
We used some version of Adobe Premiere Pro (CS2 I think). I've used a lot of Avid stuff and some Final cut in the past, but I only had access to Premiere at the time. Premiere was very easy to use and integrated beautifully, and has a pretty reasonable system requirement and system resource footprint; although I honestly haven't directly compared Avid Xpress to Premiere Pro.
It worked great for what we were doing so I may give it some more face time in the future.
EDITING
I dropped in the composited scenes. Since the animators worked within a specific provided frame count and format it was easy to apply the pacing and timing of the animatic to the rough edit. I didn't do too much editing, except for shaving frames and messing with the final scene and credit cuts a bit.
FINAL SOUND
A LOT of time was spend in sound. Although I used most of the animatic sound effects, I found I had to use some alternates and add more sound.
After sound was near completion I had to go back in and try to balance sound levels on my mediocre speakers. I'm not at all a music or sound person, but I recognize how sound and correcting sound levels is super important because some of the elements in Timmy needed to contrast the quiet and the loud in order to be funny.
So taking time to make sure sounds were effecting the correct beats really help sell a gag.
Sound is honestly 1/2 the power of a cartoon/film.
INVOLVED PARTIES
These are the super talented and hard working individuals (a.k.a. idiots) that broke their backs to make this cartoon.
Chris Allison: animator, effects, bg painter, emotional support.

Chris animated the opening of the gift and did many effects and finishing touches; including adding blood to the final scene 8 and
adding cute glow effects to scenes 3 and 4:
BG painter on the last scene
Also Chris had a huge hand in helping to design the sound and making editing choices.
(he also kept me awake during late evening of drawing and compositing).
Ryan Khatam: Animator for most of the close-up scenes. He came in last minute and cranked out the 3 scenes I needed in 1/2 a night.
He pulled out some bad ass funny drawings in an incredibly quick time frame. He pretty much cranked scenes out and saved me from having a couple early-life heart attacks (as I wasn't planning one until sometime shortly after my first divorce).

RYAN'S FUNNY ASS EXPRESSION! This is what people should look like after watching animation.
John Martinez: did the sweet pencil BG layouts.
David Gemmil: animator on the opening scene. Uber-talent. professional funny eye expresionaire.

more of David's hilarious stills are listed above in the blog.
Mike Nassar (ME): I created, directed, boarded, animated the last scene, painted BG,
and a bunch of of other stuff. Including crap that took my time away from drawings (like compositing and rendering)

Aaron Schlicting: Aaron couldn't animate to save his life; he's a live action guy. But he helped out on one of he most important elements of this picture...he helped me come up with the gag! yeah for Aaron!
Thanks for reading! Go watch some cartoons!
-Mike
825 comments:
«Oldest ‹Older 1001 – 825 of 825Post a Comment